
Why it’s beneficial
If you have Parkinson’s disease, you may find that practicing yoga does more than just promote relaxation and help you get a good night’s sleep. It can help you become more familiar with your body and its capabilities.
For example, certain poses target specific muscle groups, which you can use to your advantage to help control tremors. You may also use your practice to help increase your mobility, flexibility, and strength.
Keep reading to learn how these moves can help improve your overall quality of life. Remember that you and your practice will change on a daily basis. Letting go of your expectations will help you be present in each moment.
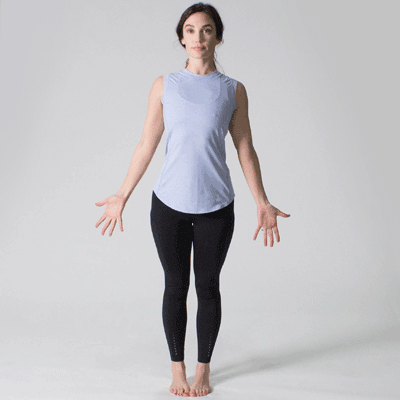
This standing pose can help improve balance and posture. It helps strengthen the thighs, knees, and ankles. It can also help ease sciatic pain.
Muscles worked:
- quadriceps
- obliques
- rectus abdominis
- transversus abdominis
To do this:
- Stand with your big toes touching and your heels slightly apart.
- Allow your arms to hang down at your sides. Your palms should face forward.
- Feel free to adjust the width of your feet and position of your arms to support your balance.
- Engage your thigh muscles and put a slight bend in your knees. You should still stand tall — this bend is to help activate your thigh muscles and prevent you from locking your knees.
- Feel a line of energy running from your ankles up through the crown of your head.
- Relax your shoulders and open your heart center.
- You can stay still, or move your weight front and back, and side to side.
- Hold this pose for up to 1 minute.
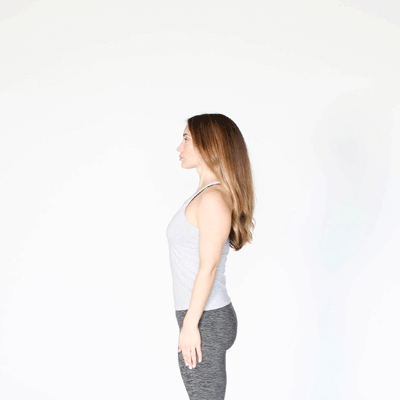
This is another standing pose that can help improve your posture and balance. It stretches the shoulders and armpits, which may relieve backache.
Muscles worked:
- rectus and transversus abdominis
- obliques
- biceps
- serratus anterior
You may find it easier to transition into Upward Salute from Mountain Pose.
To do this:
- From Mountain Pose, lift your arms above your head.
- Extend your arms above your shoulders.
- If your flexibility allows, bring your palms together to form prayer position overhead.
- Relax your shoulders as you reach up toward the ceiling with your fingers.
- Feel a line of energy running from your ankles up through your spine and out through the crown of your head.
- Relax the back of your neck. If it’s comfortable for you, turn your gaze up toward your thumbs.
- Lengthen your spine as you tuck your tailbone down and under.
- Breathe deeply in this position for up to 1 minute.
This calming posture helps strengthen your legs, knees, and hips. Because of its meditative nature, this pose is also thought to help ease stress and anxiety.
Muscles worked:
- spinal muscles
- piriformis
- hamstrings
- gastrocnemius
- gracilis
To do this:
- Stand with your feet directly underneath your hips.
- With your hands on your hips, hinge at the hip joints to fold forward.
- Lengthen your spine as you bend forward.
- Drop your hands down to any comfortable position.
- If needed, keep a slight bend in your knees.
- Focus on releasing tension in your lower back and hips.
- Tuck your chin into your chest and allow your head to fall heavy toward the floor.
- Remain in this position for up to 1 minute.
- To release the pose, take your hands to your hips, lengthen your torso, and lift yourself back up to standing.
This is a classic standing pose. It helps strengthen your legs and ankles while increasing your stamina. It’s a great way to stretch your chest, shoulders, and groin.
Muscles worked:
- quadriceps
- thigh adductors
- deltoids
- gluteus medius
- rectus and transversus abdominis
You may find it easier to transition into Warrior II from Mountain Pose.
To do this:
- From Mountain Pose, step your left foot back with your toes facing out at a slight angle.
- Keep your right foot facing forward.
- Lift up your arms so they’re parallel to the floor, with your palms facing down.
- Slowly bend your right knee forward.
- Make sure your knee doesn’t extend past your ankle. A straight line should run from your ankle to your knee.
- Press firmly into both feet as you lengthen your spine and extend your energy through your front and back fingertips.
- Keep your gaze out over your front fingertips.
- Hold this pose for up to 30 seconds.
- Repeat on the opposite side.
This is a classic balancing pose. It helps strengthen your ankles, legs, and spine while stretching your thighs, chest, and shoulders. This can help improve your balance while also relieving sciatic pain.
Muscles worked:
- rectus and transversus abdominis
- adductor longus
- iliacus
- quadriceps
- hamstrings
To do this:
- Stand near a chair or wall for balance and support.
- Start to bear your weight on your left foot.
- Bring your right foot to your right ankle, calf, or thigh.
- Avoid pressing your foot into your knee.
- Bring your arms to your hips, in prayer pose in front of your chest, or extended overhead.
- Feel free to bring your hands to your support for added balance.
- Keep your gaze focused on a point on the floor in front of you.
- Remain in this pose for up to 1 minute.
- Repeat on the opposite side.
This gentle backbend can help strengthen your upper body, spine, and thighs. It stimulates the abdominal organs, which can help ease indigestion, flatulence, and constipation.
Muscles worked:
- trapezius
- erector spinae
- gluteus maximus
- triceps
To do this:
- Lie on your stomach with your arms alongside your body and your palms facing up.
- Bring your big toes together with your heels turned out slightly.
- Rest your forehead gently on the floor.
- Lift your head, chest, and arms partway or all the way up.
- You can lift your legs if it’s comfortable.
- Rest on your lower ribs, stomach, and pelvis.
- Feel a line of energy going out through your fingertips.
- Keep your gaze forward or slightly upward.
- Hold this pose for up to 1 minute.
- Upon regaining your breath and resting, you may repeat the pose once or twice.
This restorative forward bend is an excellent resting pose. It gently stretches the hips, thighs, and ankles to help relieve tension and pain in the back. It also helps calm the mind, relieving stress and fatigue.
Muscles worked:
- spinal extensors
- hamstrings
- tibialis anterior
- trapezius
To do this:
- Sit back on your heels with your knees together or slightly apart.
- You may place a cushion underneath your bottom for support.
- Walk your hands in front of you as you hinge at the hips to fold forward.
- Keep your arms extended in front of you, or bring your arms alongside your body.
- Rest your forehead on the floor.
- Allow your chest to fall heavy into your knees as you breathe deeply.
- Notice any tightness you’re holding in your body, and focus on releasing this tension.
- Relax in this pose for up to 5 minutes.
This restorative hip opener stretches and increases flexibility in your inner thighs, groin, and knees. It also stimulates the abdominal organs and the heart, which may help improve circulation.
Muscles worked:
- adductors
- groin muscles
- pelvic muscles
- psoas
To do this:
- Lie on your back and bring the soles of your feet together with your knees out wide.
- Align your body so your spine, neck, and head are in one line.
- You may place a folded towel or pillow underneath your knees, shoulders, and feet for support.
- Allow your arms to relax in any comfortable position.
- Move your feet further away from your hips to reduce the intensity of the pose.
- Relax the area around your hips and thighs.
- Focus on releasing any tightness and tension in this area.
- Remain in this pose for up to 10 minutes.
This restorative inversion stretches and increases flexibility in the back of your neck, front torso, and back legs. It can help relieve mild backache, as well as help with digestion.
Muscles worked:
- hamstrings
- neck
- front torso
- lower back
- pelvic muscles
To do this:
- Sit on the floor with your right shoulder facing a wall.
- Lie on your back as you swing your legs up along the wall. Your body should form a 90-degree angle against the wall.
- If you can, keep your sitting bones close to the wall.
- You may place a folded blanket underneath your hips for support.
- Keep your spine and neck in one line.
- Allow your arms to rest in any comfortable position.
- Breathe deeply and allow your body to relax.
- Focus on releasing any tension you’re holding in your body.
- Remain in this pose for up to 15 minutes.
This restorative pose is usually done at the end of a practice to help relieve any lingering stress or tension. It may also help relieve headache, fatigue, and insomnia.
To do this:
- Lie flat on your back. Your arms should rest alongside your body with your palms facing up.
- Situate yourself so that your feet are out a little wider than your hips. Allow your toes to splay out to the side.
- Adjust your body so your spine, neck, and head are in one line.
- Allow your body to fully relax as you release any tension. Focusing on your breath can help you quiet your mind.
- Stay in this pose for 10-20 minutes.
Research and anecdotal evidence support practicing yoga to manage Parkinson’s disease for some people. Discuss the possibility of practicing yoga with your doctor and a potential yoga teacher to see if it could help you.
The results of one 2013 review found that practicing yoga helped improve functional mobility, balance, and lower-limb strength in people with Parkinson’s disease. In addition to improved balance, flexibility, and posture, participants experienced a boost in mood and better sleep quality.
Researchers in a
Although these results are promising, additional studies are needed to expand upon these findings.
Practicing yoga may be beneficial in managing Parkinson’s disease, but discuss it with your doctor before beginning any program. They can walk you through any concerns you may have and offer guidance on how to establish and maintain a healthy lifestyle.
Find a yoga teacher who can create a class or practice to meet your needs. This may be on an individual or group basis.
You can establish a home practice with as little as 10 minutes per day. You can use books, articles, and guided online classes to support your process. Go at your own pace, and do what feels best. Being gentle with yourself is key.